Survival Manual
This section will give you some information regarding this application, but if you are in a survival situation right now - please skip this blurb and jump directly to the section that contains the information you need.
Foreword
This book is based on the original US Army FM 3-05.70 Field Manual which was kindly edited and shortened to Ligi's Survival Manual and is available in a wiki. However, it was ultimately thought to be consumed by a specific app, and is not set up for internationalization. And by now, the 2018 revision of the field manual is out and shouts for updating of the content. So we will start with the original content by Ligi and gradually replace this with the updated content. The current online edition of the book can always be found here, and a epub version of the book can be downloaded and read offline from here.
Last but not least, the original field manual is in the public domain, all content in this book is licensed under the CC0 license (so you can basically do with it whatever you want).
If you want to contribute to the book, provide illustrations, help to translate it (not yet!) or suggest improvements, feel free to do so. Other things I could think of, are region-specific adaptations to e.g. plants and animals in Europe vs Asia, etc...
About the Book
This app is intended to guide you in rough times, but it can also be used to have fun outdoors and to learn things that are useful to know in case of an emergency. The fun parts can also be used to train important skills for potential survival situations. Remember, reading is only one factor - practice and understanding are also needed to increase your skillset and improve your chances of survival.
If you have a question, please check out the FAQs - it is possible your question is already answered there.
Thanks to everyone who made this app possible! You can find some of them in the credits.
Original Introduction
ATP 3-50.21, Survival, sets forth the doctrine pertaining to survival in an isolated situation. The ATP discusses the tenets of survival and the methods Soldiers, DA civilians, and DA contractors can use when surviving individually or in a group. It aligns and nests with FM 3-50’s discussion of personnel recovery. The personnel recovery mission includes preparing Army personnel in danger of isolation while participating in any activity or mission sponsored by the United States. Isolation refers to persons separated from their unit or in a situation where they must survive, evade, resist, or escape. ATP 3-50.21 contains nine chapters and two appendixes. The following is a brief description of each chapter and appendix: Chapter 1 provides an overview of personnel recovery and discusses survival proficiencies. Chapter 2 discusses survival medicine applications. Chapter 3 covers water collection methods. Chapter 4 discusses food collection and preparation methods. Chapter 5 focuses on fire craft for survival. Chapter 6 covers constructing shelters in the field and clothing. Chapter 7 discusses land navigation methods. Chapter 8 covers survival, evasion and recovery equipment. Appendix A discusses ropes and knots useful for survival applications. The U.S. Army Personnel Recovery Proponent made a decision to divide the revision of FM 3-05.70, Survival from one large volume into separate ATPs for easier access and reading. ATP 3-50.21 is the second in a series of ATPs for Army personnel recovery. The series also includes the following: z ATP 3-50.20, Survival, Evasion, Resistance and Escape (SERE) Preparation and Planning, discusses the preparation and training required to conduct SERE operations in a theater. z ATP 3-50.22, Evasion, discusses evasion techniques used to evade enemy forces and prepare for recovery from friendly forces or by self-recovery.
Chapter 1: Overview
Survival is the state of or fact of continuing to live or exist in spite of an isolating event. The end goal is to return to friendly forces with honor. This chapter discusses survival skills and situational understanding needed.
PERSONNEL RECOVERY
1-1. Army personnel recovery is the military efforts taken to prepare for and execute the recovery and reintegration of isolated personnel. (FM 3-50) Personnel recovery aims to return isolated personnel to duty as well as to sustain morale, increase operational performance, collect information, and develop intelligence. Army forces work with unified action partners to recover individuals and groups who become isolated. Isolation refers to persons separated from their unit or in a situation where they must survive, evade, resist, or escape.
1-2. All Soldiers, Department of Army civilians and supporting contractors must understand how Army survival, evasion, resistance, and escape (SERE) relates to personnel recovery. Survival, evasion, resistance, and escape is defined as actions performed by isolated personnel designed to ensure their health, mobility, safety, and honor in anticipation of or preparation for their return to friendly control (JP 3-50). Army SERE represents actions that enable isolated individuals to survive and return to friendly control as soon as possible. SERE focuses on the actions of the isolated person or group of isolated persons.
SURVIVAL
1-3. Table 1-1 identifies the four SERE actions and their related proficiencies. Survival begins when a Soldier executes their isolated Soldier guidance (ISG) or evasion plan of action (EPA). The survival proficiencies include protection, sustenance, survival medicine, and navigation. Units and individuals train on these proficiencies to improve and sustain individual task proficiency.
| Survival | Evasion | Resistance | Escape |
|---|---|---|---|
| Protection | Capture avoidance | Organization | Restraint defeat |
| Sustenance | Detection avoidance | Exploitation resistance | Cell defeat |
| Survival medicine | Recognition avoidance | Captivity communication | Building defeat |
| Navigation | Communication | Health | Installation defeat |
| Recovery | Honor |
1-4. The recovery of isolated personnel and their return to friendly control is dependent upon their ability to employ relevant knowledge and skills of the survival proficiencies tailored to their operational environment.
SURVIVAL MEDICINE
1-5. Survival medicine is characterized by remote and improvised care of isolated personnel with routine or exotic physical or psychological illnesses or trauma, limited resources and labor, and delayed evacuation to definitive care. There are four fundamentals common to survival medicine: prevention, recognition, mitigation, and treatment. Assess these fundamentals during planning and preparation activities and include relevant physical and psychological factors. Additionally, they form the basis for effective organization, training, and equipping efforts by the commander and staff, unit recovery force and the individual. Planning is the art and science of understanding a situation, envisioning a desired future, and laying out effective ways of bringing that future about (ADP 5-0).
Sustenance
1-6. Sustenance includes procuring, preparing, and storing adequate food and water to enable the isolated person's normal body functions and to provide strength, energy, and endurance to overcome the stress of survival. Isolated personnel must be prepared to use a variety of both native and domestic food sources, obtain water using various methods, and be able to prepare and preserve food and water throughout the duration of their isolation. Assess life-sustaining food and water needs during planning and preparation activities and integrate into organization, training, and equipping considerations by the commander and staff, unit recovery force, and the individual. Preparation are those activities by units and Soldiers to improve their ability to execute operations (ADP 5-0).
Protection
1-7. Protection includes wear and care for protective clothing and equipment, the ability to build appropriate shelter and fire and the application of basic security measures. Protection needs are assessed during planning and preparation activities and integrated into organization, training, and equipping considerations by the commander and staff, unit recovery force, and the individual. Army forces are typically equipped and prepared to survive for up to 96 hours of isolation subject to recovery force capabilities, threats, and environmental conditions. ATP 3-50.20, chapter 2 provides an in-depth discussion on duration of isolation.
Navigation
1-8. Navigation requirements for isolated personnel are met through planning and preparation efforts that focus on a combination of (Global Positioning System) GPS, map and compass, and field expedient techniques in a specific operational environment for the purpose of surviving, avoiding capture, and facilitating recovery. Navigational limitations and opportunities relating to terrain and illumination are identified and analyzed to subsequently organize, train and equip personnel to conduct precise movements to desired locations such as recovery areas, recovery sites and rally points to enable link-up with recovery forces. Assess navigation needs during planning and preparation activities and integrated into organization, training, and equipping considerations by the commander and staff, unit recovery force, and the individual.
PSYCHOLOGY OF SURVIVAL
1-9. It takes much more than the knowledge and skill to build shelters, gather food, build fires, and move without the aid of standard navigational devices, to survive isolation and possible detention or captivity. The key ingredient in any survival situation is the mental attitude of the isolated person involved. Having survival skills is important; having the will to survive is essential. Without a desire to survive, acquired skills serve little purpose and invaluable knowledge goes to waste.
1-10. During isolation, isolated personnel will experience numerous stressful moments that will shape them for the remainder of their lives. Stress is not a disease that you cure and eliminate. Instead, we all experience a condition. Stress is our reaction to pressure. It is the name given to the experience we have as we physically, mentally, emotionally, and spiritually respond to life's tensions.
1-11. Stress compels one to act or prepare to respond to any given situation. Humans need stress because it can have many positive benefits. Stressful situations provide humans with challenges and give them chances to learn about their values and strengths. Stress can show them their ability to handle pressure without breaking. It tests their adaptability and flexibility, and can stimulate and motivate them to do their best. The goal is to have stress, but not in excess. Too much stress leads to distress. Distress causes an uncomfortable tension that a person tries to escape or avoid. Here are a few of the common signs of distress that isolated personnel will encounter during isolation:
- Difficulty making decisions.
- Forgetfulness.
- Low energy level.
- Constant worrying.
- Propensity for mistakes.
- Carelessness.
- Trouble getting along with others.
- Withdrawing from others.
- Angry outbursts.
- Hiding from responsibilities.
- Thoughts about death or suicide.
1-12. Stress can encourage or discourage, move us along or stop us dead in our tracks, and make life meaningful or seemingly meaningless. It can inspire us to operate successfully and perform at maximum efficiency. It can also cause us to panic and forget all common sense and training. One key to survival is the isolated person's ability to manage the inevitable stresses that they will encounter.
SURVIVAL STRESSORS
1-13. Once the body recognizes the presence of a stressor; it protects itself and/or address the stressor. Often, stressful events occur simultaneously. In response to a stressor, the body prepares to either "fight, flight or freeze." This causes the following coping reactions that cannot be maintained for long periods:
- The body releases stored fuels (sugar and fats) to provide quick energy.
- Breathing rate increases to supply more oxygen to the blood.
- Muscle tension increases to prepare for action.
- Blood clotting mechanisms activate to reduce bleeding from cuts.
- Senses become more acute (hearing becomes more sensitive, pupils dilate, smell becomes sharper) so that you are more aware of your surroundings.
- Heart rate and blood pressure rise to provide more blood to the muscles.
1-14. The cumulative effect of stress and stressors can add up if not managed properly. As the body's resistance to stress wears down and the sources of stress continue (or increase), a state of exhaustion arrives. At this point, the ability to resist stress or use it in a positive way gives out and signs of exhaustion appear. Anticipating stressors and developing strategies to cope with them are two ingredients in the effective management of stress. Therefore, it is essential that isolated persons are aware of the types of stressors that they could encounter. Injury, illness, disability, and death are real possibilities that one may have to face.
PREPARING YOURSELF
1-15. The isolated person's mission is to stay alive. The assortment of thoughts and emotions isolated persons will experience in a survival situation can work for them, or against them. Fear, anxiety, anger, frustration, guilt, depression, and loneliness are all possible reactions to the many stressors common to survival. These reactions, when managed in a healthy way, help to increase the likelihood of surviving. They prompt people to pay more attention in training, to fight back when scared, to take actions that ensure sustenance and security, to keep faith with their fellow team members, and to strive against large odds. When isolated personnel cannot control these reactions in a healthy way, they can bring them to a standstill. Instead of rallying their internal resources, they listen to their internal fears and which causes the isolated person to experience psychological defeat long before they physically succumb. Remember, survival is natural to everyone; being unexpectedly thrust into the life-or-death struggle of survival is not.
BE REALISTIC
1-16. Isolated personnel should not be afraid to make an honest appraisal of the situation. They should see circumstances as they are, not as one wants them to be, while keeping hopes and expectations within the estimate of the situation. When going into a survival setting with unrealistic expectations, one may be laying the groundwork for bitter disappointment. Follow the adage, "Hope for the best, prepare for the worst." It is much easier to adjust to pleasant surprises about unexpected good fortunes than confronted with unexpected harsh circumstances.
ADOPT A POSITIVE ATTITUDE
1-17. Isolated personnel should learn to see the potential good in everything. While looking for the good not only boosts morale, it also is excellent for exercising their imagination and creativity. While trying to take ordinary objects and figuring out different uses for them in a survival situation, everything is a potential tool.
TRAIN AND PREPARE
1-18. Through military training and life experiences, begin today to prepare to cope with the rigors of survival. Isolated personnel capable of demonstrating their skills in training today will have the confidence in their ability to call upon if the need should arise. The goal of preparation is to build confidence in your ability to function despite your situation and fears. Failure to prepare yourself physically and psychologically to cope with isolation leads to reactions such as depression, carelessness, inattention, loss of confidence, and poor decision-making. Remember that your life and the lives of others who depend on you are at stake.
SURVIVAL PATTERN
1-19. The survival pattern is a tool that enables isolated personnel to mitigate the effects of being an in an isolation situation. The survival pattern includes the manipulation of applicable sustenance, protection, navigation and survival medicine skills placed in order of priority. For example, in a cold environment, fire would be the first priority to get warm; followed by a shelter to protect from the cold, wind, and rain or snow; access to or the ability to procure potable water; traps or snares to get food; and survival medicine to maintain health. In all isolation situations, survival medicine has top priority.
1-20. In figure 1-1, the word SURVIVAL is a useful memory tool to aid isolated personnel in making sound
decisions on what has to happen to meet their needs and appropriate actions.
| S | Size Up the Situation (Suroundings, Physical Condition, Equipment) |
| U | Use All Your Sense, Undue Haste Makes Waste |
| R | Remember Where You Are |
| V | Vanquish Fear and Panic |
| I | Improvise |
| V | Value Living |
| A | Act Like the Natives |
| L | Live by Your Wits, But for Now, Learn Basic Skills |
1-21. Building and maintaining situational understanding is essential for isolated personnel to understand their isolation situation, develop effective plans, make quality decisions and execute their ISG or EPA.
1-22. The typical isolation scenario includes the occurrence of an isolating event and the typical movement of personnel to their designated rally point. Once at the rally point, they assess their situation in relation to the mission and the isolation criteria specified in their ISG/EPA. The isolation criteria prescribes the set of circumstances under which a Soldier/isolated person may execute their ISG/EPA. The assessment of isolation criteria includes the operational political, military, economic, social, information, infrastructure, physical environment, and time (PMESII-PT) and mission variables mission, enemy, terrain and weather, troops and support available, time available, and civil considerations (METT-TC) and comprehension of the factors of isolation, individual capability (i.e. physical and psychological condition, proficiency of training, equipment), effects posed by an operational environment and the potential duration of the isolation situation. If the isolated person determines that they have met the isolation criteria stated in their ISG/EPA, they will report their isolation and begin appropriate movements and techniques detailed in their ISG/EPA.
1-23. Isolated personnel continue to adjust their plan to meet survival medicine, protection, sustenance, and navigation needs in order of priority and update their situational understanding as key tactical factors change while making appropriate adjustment decisions.
Chapter 2: Survival Medicine
Isolated persons require knowledge of many different survival skills to return to friendly forces. This chapter will discuss the psychology of survival, treatment for shock, and survival medicine practices.
SURVIVAL MEDICINE VERSUS TRADITIONAL MEDICINE
2-1. Excluding the enemy, medical related problems arising from combat and isolation pose the greatest threat to isolated personnel. Isolated personnel must understand the vast differences and transition of medical care that take place following combat, isolating events, and implementation of the isolated person's ISG/EPA. Isolated personnel must be able to perform fundamental survival medicine techniques throughout the duration of their isolation including during evasion, detention or captivity, and recovery. During combat operations, injured Soldiers follow Tactical Combat Casualty Care (TCCC) guidelines and protocols focused on the care of casualties in a combat or tactical environment at the point-of-injury. The TCCC program of instruction prepares Soldiers to provide self-aid or buddy-aid in the absence of a medical provider. Four transitions of medical care occur on the battlefield that includes isolation producing events.
- Perform Care under Fire (CUF) at the point-of-injury on the battlefield. The Soldier is typically equipped with the Improved First Aid Kit (IFAK), Combat Pill Kit, and Eye Shield. The Soldier returns fire and takes cover while focused on the treatment of massive hemorrhage.
- Perform Tactical Field Care when no longer under hostile fire. The Soldier is equipped with the
Individual First Aid Kit (IFAK), Combat Pill Kit, and Eye Shield. The Soldier is subject to a
reduced level of hazard from hostile fire, more time is available to provide care based on the
tactical situation, a security perimeter is established and the casualty evaluated for altered mental
status. Follow the MARCH algorithm as a guide to the sequence of treatment priorities in caring
for combat casualties:
- Massive hemorrhage — control life threatening bleeding.
- Airway — establish and maintain a patent airway.
- Respiration — decompress suspected tension pneumothorax, seal open chest wounds, and support ventilation/oxygenation as required.
- Circulation — establish intravenous (IV) access and administer fluids as required to treat shock.
- Head injury/Hypothermia — prevent/treat hypotension and hypoxia to prevent worsening of traumatic brain injury and prevent/treat hypothermia.
- Perform medical care at the point-of-injury throughout isolation. Typically, the Soldier's IFAK and supporting medical supplies are already expended; therefore, Survival medicine takes over at this point. Survival medicine recognizes the fundamentals of the MARCH algorithm and provides a flexible approach that prioritizes actions relevant to physical, psychological, and environmental considerations that are continually assessed and prioritized for performance by isolated personnel.
2-2. Survival medicine requires isolated personnel to—
- Understand the fundamentals of trauma first aid (MARCH) and survival medicine.
- Assess and prioritize applicable fundamentals from trauma first aid and survival medicine in a resource-constrained environment.
- Execute those fundamentals under sub-optimal healing conditions.
- Continually assess the isolated person's mental state and enables appropriate adjustments.
- Understand that medical personnel and facilities are rarely available.
2-3. Survival medicine employs four techniques to facilitate isolated personnel performance of survival proficiencies. These techniques include—
- Prevention. The common sense act of proactive prevention or hindrance of an action that could lead to a requirement to perform trauma first aid or survival medicine. For example, during evasion movement, the Soldier looks for alternate crossing points across a river instead of swimming across to decrease the chance of getting hypothermia and having to dry their clothing.
- Recognition. The act of actively recognizing—
- Symptoms (urine color and relation to dehydration).
- Capabilities (identify local medicinal plants such as cattails, willow during movement).
- Identity (poisonous snakes or insects) by the isolated person.
- Mitigation. The actions taken to immediately reduce the severity and or pain associated with a survival related injury or illness (application of a tourniquet to stop severe, uncontrolled bleeding that could cause loss of life)
- Treatment. The actions taken to manage and care for the isolated person with a disease or disorder and restore their health. The ability of the isolated person or personnel to plan, prepare, execute and assess appropriate actions to meet their survival needs significantly increases their overall chances of survival, increases morale, and aids in their ability to perform the survival proficiencies and eventual return to friendly forces.
*** PERSONAL HYGIENE AND SANITATION
2-4. Isolated persons can avoid many different kinds of illnesses and infections by practicing good sanitation and hygiene. Maintaining a clean body and living area will prevent the spread of germs and bacteria whether alone or in a group. It will also allow isolated persons to stay organized and protect items from animal contact.
2-5. Application of the following guidelines regarding personal health and hygiene will enable isolated personnel to safeguard personal health and the health of others while detained or captive.
- Stay clean (daily regimen).
- Minimize infection by washing. (Use white ashes, sand, or loamy soil as soap substitutes.)
- Comb and clean debris from hair.
- Wash your hands thoroughly after handling any material that is likely to carry germs, after urinating or defecating, after caring for the sick, and before handling any food, food utensils, or drinking water.
- Cleanse mouth and brush teeth.
- Use hardwood twig as toothbrush (fray it by chewing on one end then use as brush).
- Use a single strand of an inner core string from parachute cord for dental floss.
- Use a clean finger to stimulate gum tissues by rubbing.
- Gargle with salt water to help prevent sore throat and aid in cleaning teeth and gums.
- Clean and protect feet.
- Change and wash socks
- Wash, dry, and massage.
- Check frequently for blisters and red areas.
- Use adhesive tape/mole skin to prevent damage.
- Keep your clothing and bedding as clean as possible to reduce the chances of skin infection or parasitic infestation.
- Exercise daily.
- Prevent and control parasites.
- Check body for lice, fleas, ticks.
- Check body regularly.
- Pick off insects and eggs (DO NOT crush).
- Use commercial and expedient (ex. rub cedar boughs on your body) repellants.
- Use smoke to fumigate clothing and equipment.
- Avoid illness.
- Purify all water obtained from natural sources by using iodine tablets, bleach, or boiling for 5 minutes.
- Locate latrines 200 feet from water and away from shelter.
- Clean all eating utensils after each meal.
- Prevent insect bites by using repellent, netting, and clothing.
- Eat varied diet.
- Try to get 7-8 hours' sleep per day.
2-6. Survival medicine capabilities in the Survival Kit. Prior to operations, personnel assess the survival kit to identify its survival medicine components. It is recommended that the Soldier rehearse appropriate survival medicine techniques using similar materials as those found in the actual survival kit. The survival medicine capabilities that should be considered for inclusion in the survival kit includes these items: Water purification tablets.
- Small tube of antibiotic ointment.
- 1 oz. bottle of 2% tincture of iodine.
- Small tube of Crazy Glue/Super Glue.
- Small tube/bottle of Betadine.
- Emergency blanket.
- Floss card (dental floss).
- Small roll of Duct tape with peel-away backing.
- Heavy duty canvas sewing needle.
- Assorted dressings.
- Assorted bandages.
- Combat Gauze.
- SOFT-T or combat application tourniquet (CAT) or Israeli bandage.
- Small package of prescription medications, contacts.
- Gear that accomplishes more than one task (ex. Use a large bandana as a compress, sling, bandage, and eye patch).
Appendix A: Survival Knots and Rope
To be able to construct shelters, traps and snares, weapons and tools, and operate personnel recovery devices and equipment the isolated person should have a basic knowledge of ropes and knots and some of the terminology used with them.
ROPE TERMINOLOGY
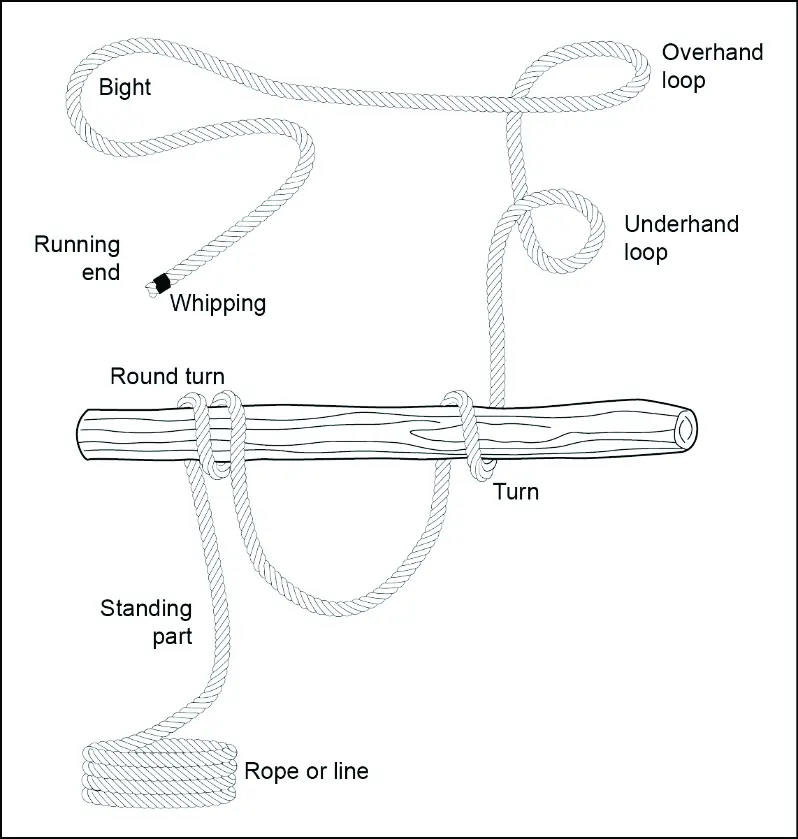
A-1. The following information is general terminology used for ropes and knots (see figure A-1, on page A2):
- Bend. A bend (called a knot in this manual) is used to fasten two ropes together or to fasten a rope to a ring or loop.
- Bight. A bight is a bend or U-shaped curve in a rope
DRESSING THE KNOT
A-2. Dressing the knot is the orientation of all knot parts so that they are properly aligned, straightened, or bundled. Neglecting this can result in a 50 percent reduction in knot strength. This term is sometimes used for setting the knot, which involves tightening all parts of the knot so they bind on one another and make the knot operational. A loosely tied knot can easily deform under strain and change, becoming a slipknot or worse, untying. Rope terminology includes the following—
- Fraps. A means of tightening the lashings by looping the rope perpendicularly around the wraps that hold the spars or sticks together.
- Hitch. Used to tie a rope around a timber, pipe, or post so that it will hold temporarily, but can readily be untied.
- Knot. An interlacement of the parts of bodies as cordage, forming a lump or knot or any tie or fastening formed with a cord, rope, or line, including bends, hitches, and splices. It is often used as a stopper to prevent a rope from passing through an opening.
- Lashings. A means of using wraps and fraps to tie two or three spars or sticks together to form solid corners or to construct tripods. Lashings begin and end with clove hitches.
- Lay. The lay of the rope is the same as the twist of the rope.
- Line. A single thread, string, or cord.
- Loop. A fold or doubling of the rope through which another rope can be passed. A temporary loop is made when the running end passes over the standing part.
- Overhead turn or loop. An overhead loop is made when the running end passes over the standing part.
- Pig tail. That part of the running end that is left after tying the knot. It should be no more than 4 inches long to conserve rope and prevent interference.
- Rope. A rope is made of strands of fiber twisted or braided together.
- Round turn. The same as a turn, with the running end leaving the circle in the same general direction as the standing part.
- Running end. The running end is the free or working end of a rope.
- Standing end. The standing end is the balance of the rope, excluding the running end.
- Turn. A turn describes the placing of a rope around a specific object such as a post, a rai l, or a ring with the running end continuing in the opposite direction from the standing end. Underhand turn or loop. An underhand turn or loop is made when the running end passes under the standing part.
- Whipping. Any method of preventing the end of a rope from untwisting or becoming unwound. It is done by wrapping the end tightly with a small cord, tape or other means. It should be done on both sides of an anticipated cut in a rope, before cutting the rope in two. This prevents the rope from immediately untwisting.
- Wraps. Simple wraps of rope around two poles or sticks (square lashing) or three poles or sticks (tripod lashing). Wraps begin and end with clove hitches and get tighter with fraps. All together, they form a lashing.
BASIC KNOTS
A-3. Descriptions of basic knots and the methods for tying them are discussed in paragraphs A-4—A-25.
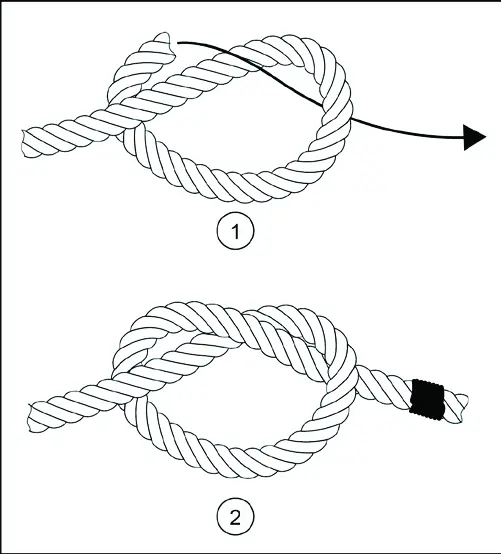
Overhand knot
A-4. This is the most commonly used and the simplest of all knots. An overhand knot may be used to prevent the end of a rope from untwisting, to form a knot at the end of a rope, or as part of another knot. This knot should replace the half-hitch as a finishing knot for other knots. This knot alone will reduce the strength of a straight rope by 55 percent. To tie an overhand knot, make a loop near the end of the rope and pass the running end through the loop, pulling it tight (see figure A-2).
Round turn and two half hitches
A-5. The round turn and two half hitches (seen in figure A-3) is the main anchor knot for one-rope bridges and other applications when a good anchor knot is required and where high loads would make other knots jam and difficult to untie. It is most used to anchor rope to a pole or tree.

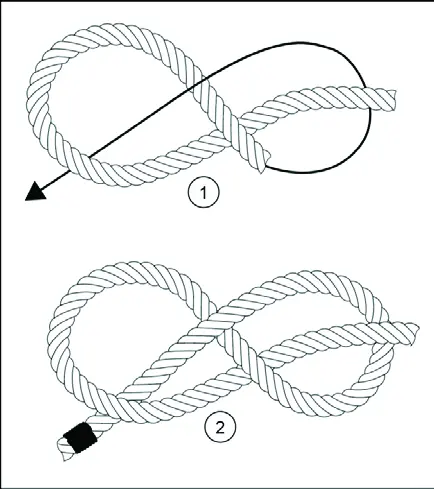
Figure-eight knot
A-6. Use the figure-eight knot to form a larger knot than would be formed by an overhand knot at the end of a rope. A figure-eight knot is used in the end of a rope to prevent the ends from slipping through a fastening or loop in another rope. To make a figure-eight knot, make a loop in the standing part, pass the running end around the standing part back over one side of the loop, and down through the loop. The running end can then be pulled tight (see figure A-4).
KNOTS FOR JOINING ROPE
A-7. When isolated persons require rope longer than the individual pieces they are equipped with or have improvised, they securely tie multiple ropes together using knots designed for adjoining rope of equal and unequal diameters in wet and dry conditions. Knots for joining two ropes fall into the following categories:
- Square knot.
- Single sheet bend.
- Double sheet ben
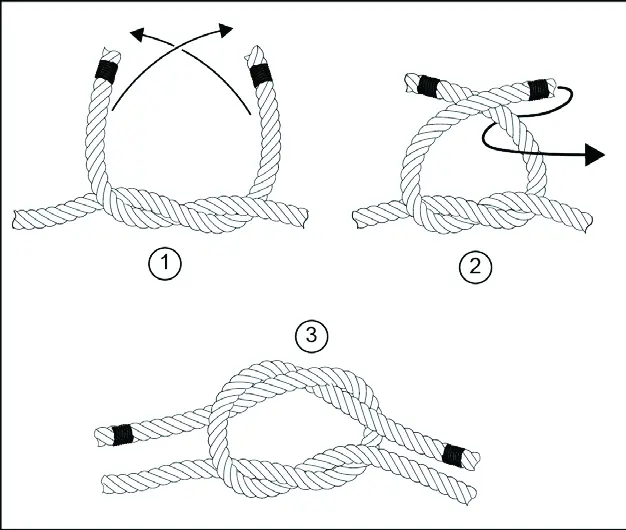
SQUARE KNOT
A-8. The square knot is used for tying two ropes of equal diameter together to prevent slippage (see figure A-5). To tie a square knot, lay the running end of each rope together but pointing in opposite directions. The running end of one rope can be passed under the standing part of the other rope. Bring the two running ends up away from the point where they cross and cross them again. Once each running end is parallel to its own standing part, the two ends can be pulled tight. If each running end does not come parallel to the standing part of its own rope, the knot is called a "granny knot." Because it will slip under the strain, a granny knot should not be used.
A-9. A square knot can also be tied by making a bight in the end of one rope and feeding the end of the other rope through and around this bight. The running end of the second rope is routed from the standing side of the bight. If the procedure is reversed, the resulting knot will have a running end parallel to each standing part but the two running ends will not be opposite each other. This knot is called a "thief" knot. It will slip under the strain and is difficult to untie. A true square knot will draw tighter under strain. A square knot can be untied easily by grasping the bends of the two bights and pulling the knot apart.
SINGLE SHEET BEND
A-10. The use of a single sheet bend, sometimes called a weaver's knot, is limited to tying together two dry ropes of unequal size. To tie the single sheet bend, the running end of the smaller rope should pass through a bight in the larger rope. The running end should continue around both parts of the larger rope and back under the smaller rope. The running end can then be pulled tight. This knot will draw tight under light loads but may loosen or slip when the tension is released (see figure A-6).
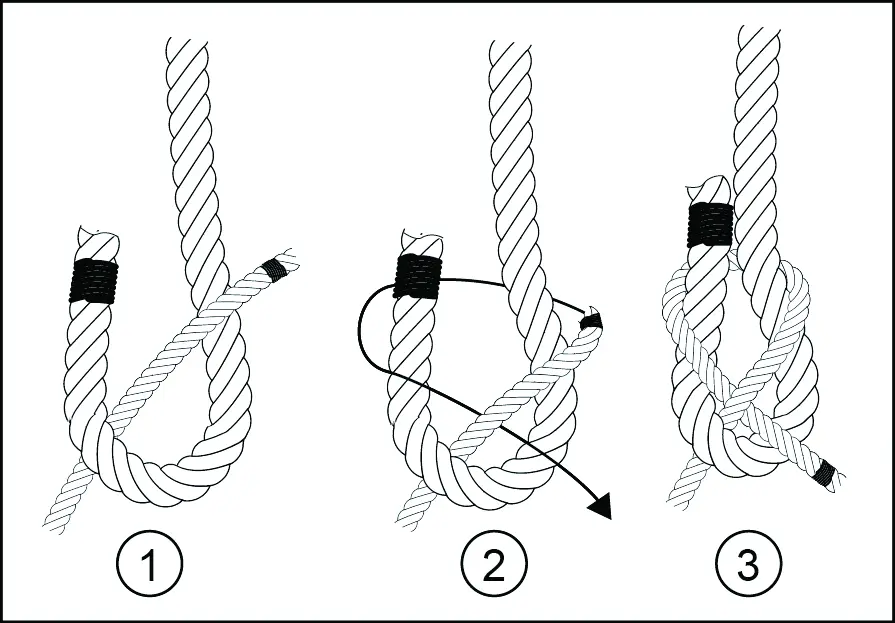
DOUBLE SHEET BEND
A-11. The double sheet bend works better than the single sheet bend for joining ropes of equal or unequal diameter, joining wet ropes, or tying a rope to an eye. It will not slip or draw tight under heavy loads. To tie a double sheet bend, a single sheet bend is tied first. However, the running end is not pulled tight. One extra turn is taken around both sides of the bight in the larger rope with the running end for the smaller rope. Then tighten the knot (see figure A-7).
KNOTS FOR MAKING LOOPS
A-12. Knots for making loops fall into the following categories:
- Bowline.
- Bowline on a bight.
- French bowline.
- Speir knot.
- Overhand knot fixed loop. The knot that the isolated person should learn and commit to memory for the use in conjunction with a recovery device is the overhand fixed loop.
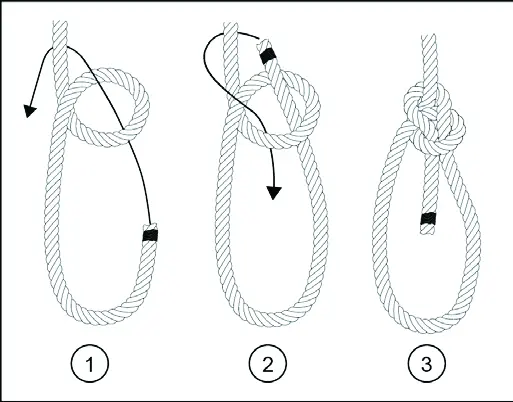
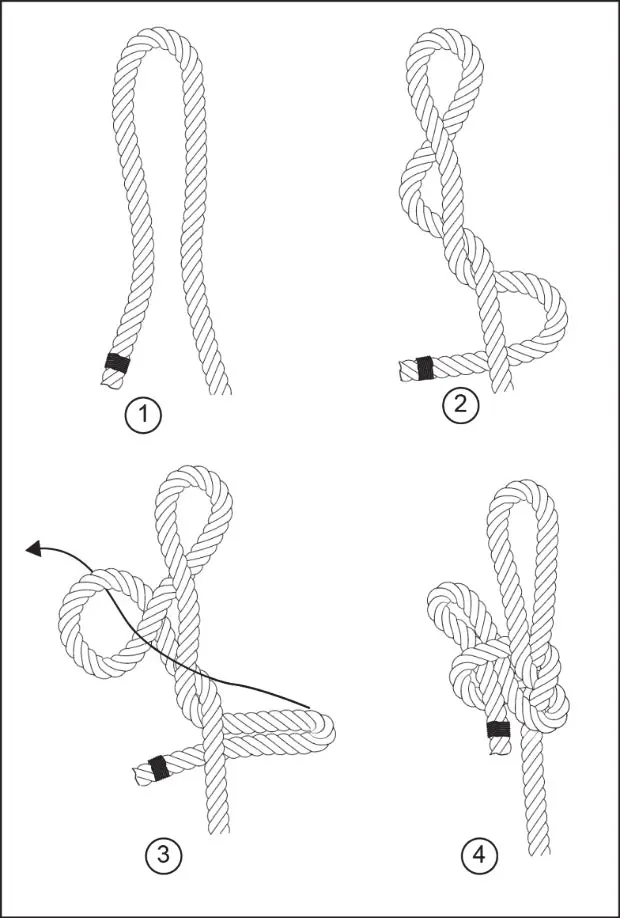
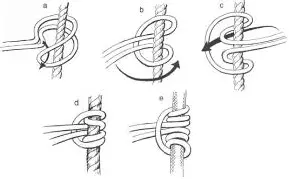
BOWLINE
A-13. The bowline is a useful knot for forming a loop in the end of a rope. It is also easy to untie. To tie a bowline knot, the running end of the rope passes through the object to be affixed to the bowline and forms a loop in the standing part of the rope. The running end is then passed through the loop from underneath and around the standing part of the rope, and back through the loop from the top. The running end passes down through the loop parallel to the rope coming up through the loop. The knot is then pulled tight (see figure A-8).
BOWLINE ON A BIGHT
A-14. It is sometimes desirable to form a loop at some point in a rope other than at the end. The bowline on a bight can be used for this purpose. It is easily untied and will not slip. The same knot can be tied at the end of a rope by doubling the rope for a short section. A doubled portion of the rope is used to form a loop as in the case of the bowline. The bight end of the doubled portion is passed up through the loop, back down up around the entire knot, and tightened (see figure A-9).
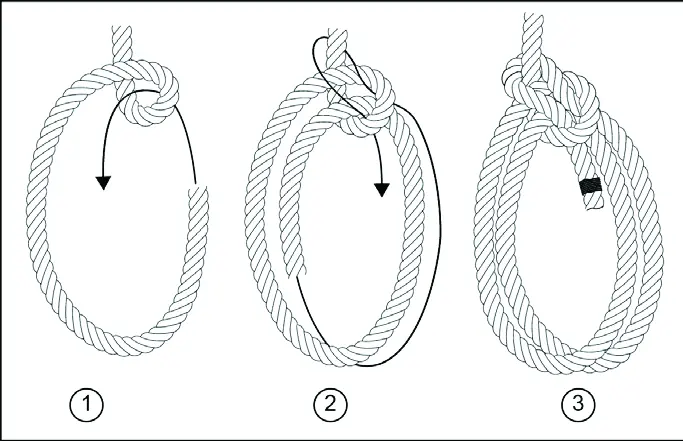
FRENCH BOWLINE
A-15. The French bowline is sometimes used as a sling for lifting people. When used in this manner, one loop is used around the body under the arms. The weight of the injured person keeps the two loops tight so that the victim cannot fall out of the sling. Therefore, it is particularly useful as a sling for someone who is unconscious.
A-16. The French bowline is started in the same way as the simple bowline. Make a loop in the standing part of the rope. The running end is passed through the loop from underneath and a separate loop is made. The running end is passed through the loop, again from underneath, around the back of the standing part and back through the loop so that it comes out parallel to the looped portion. The standing part of the rope is pulled to tighten the knot, leaving two loops (see figure A-10).
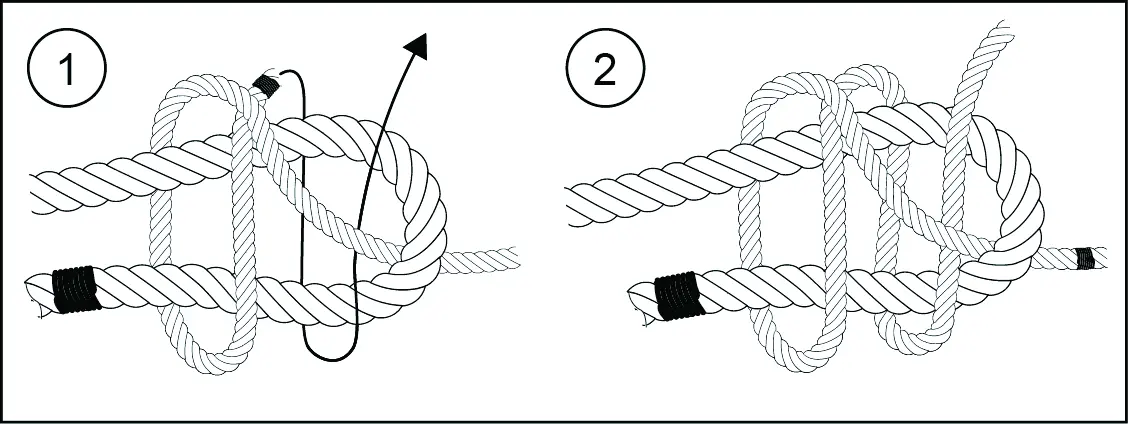
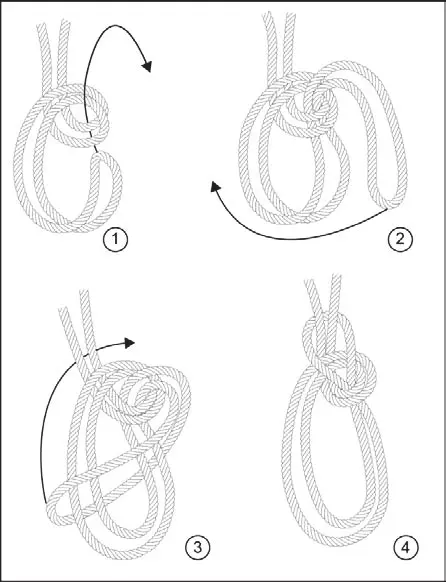
SPEIR KNOT
A-17. A speir knot is used when a fixed loop, a nonslip knot, and a quick release are required. It can be tied quickly and released by a pull on the running end. To tie a speir knot, the running end is passed through a ring or around a pipe or post and brought back on the left side of the standing part. Both hands are placed, palms up, under both parts of the rope with the left hand higher than the right hand; grasping the standing part with the left hand and the running end with the right hand. The left hand is moved to the left and the right hand to the right to form two bights. The left hand is twisted a half turn toward the body so that the bight is twisted into a loop. Pass the bight over the rope down through the loop. The speir knot is tightened by pulling on the bight and the standing part (see figure A-11).
HITCHES
A-19. A hitch is any of various knots used to form a temporary noose in a rope or to secure a rope around a timber, pipe, or post so that it will hold temporarily but can be readily undone. The types of hitches discussed in this manual are as follows:
- Half hitch.
- Two half hitches.
- Timber hitch.
- Timber hitch and half hitch.
- Clove hitch.
- Sheepshank.
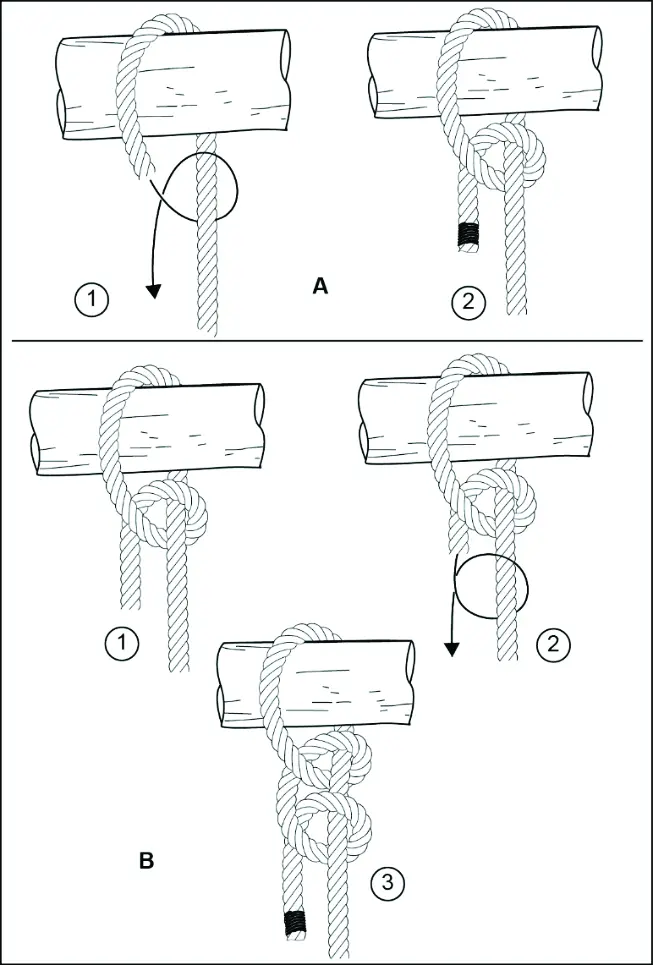
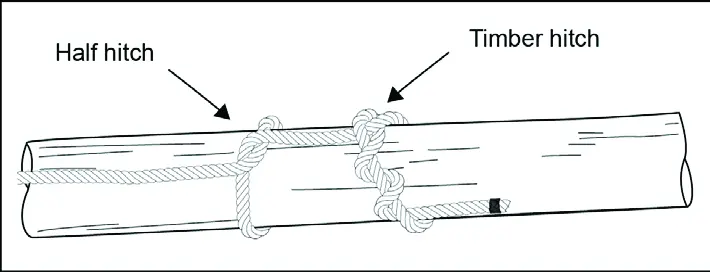
Half Hitch
A-20. This is the simplest of all knots and used to be the safety, or finishing knot for all Army knots. Because ithad a tendency to undo itself without load, it has since been replaced by the overhand. The half hitch is used to tie a rope to a timber or to another larger rope. It is not a very secure knot or hitch and is used for temporarily securing the free end of a rope. To tie a half hitch, the rope is passed around the timber, bringing the running end around the standing part, and back under itself (see figure A-12).
Timber Hitch
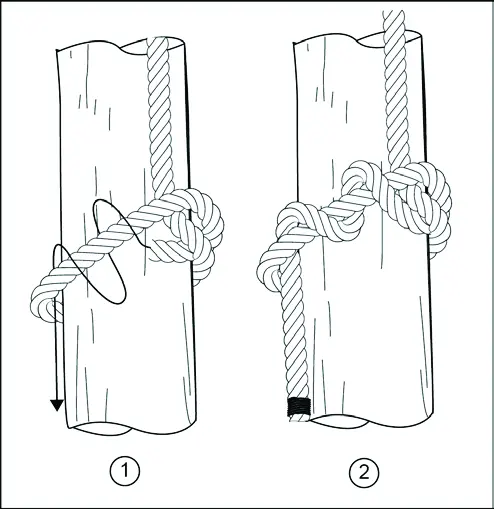
A-22. The timber hitch is used for moving heavy timbers or poles. To make the timber hitch, a half hitch is made and similarly the running end is turned about itself at least another time. These turns must be taken around the running end itself or the knot will not tighten against the pole (see figure A-13).
TIMBER HITCH AND HALF HITCH
A-23. To get a tighter hold on heavy poles for lifting or dragging, a timber hitch and half hitch are combined. The running end is passed around the timber and back under the standing part to form a half hitch. Further along the timber, a timber hitch is tied with the running end. The strain will come on the half hitch and the timber hitch will prevent the half hitch from slipping (see figure A-14).
CLOVE HITCH
A-24. A clove hitch is used to fasten a rope to a timber, pipe, or post. It can be tied at any point in a rope. To tie a clove hitch in the center of the rope, two turns are made in the rope close together. They are twisted so that the two loops lay back-to-back. These two loops are slipped over the timber or pipe to form the knot. To tie the clove hitch at the end of a rope, the rope is passed around the timber in two turns so that the first turn crosses the standing part and the running end comes up under itself on the second turn (see figure A-15).
SHEEPSHANK
A-25. A sheepshank is a method of shortening a rope, but it may also be used to take the load off a weak spot in the rope. To make the sheepshank (which is never made at the end of a rope), two bights are made in the rope so that three parts of the rope are parallel. A half hitch is made in the standing part over the end of the bight at each end (see figure A-16).

PRUSSIC
A-26. This knot ties a short rope around a longer rope (for example, a sling rope around a climbing rope) in such a manner that the short rope will slide on the climbing rope if no tension is applied, and will hold if tension is applied on the short rope. This knot can be tied with an end of rope or bight of rope. When tied with an end of rope, the knot is finished off with a bowline. The nonslip nature of the knot on another rope allows climbing of ropes with foot holds. It can also be used to anchor ropes or the end of a traction splint on a branch or ski pole. (See figure A-17).
LASHINGS
A-27. A lashing is as rope, wire, or chain used for binding, wrapping, or fastening. Numerous items require lashings for construction; for example, shelters, equipment racks, and smoke generators. The following three types of lashings are discussed in this appendix:
- Square lashing.
- Diagonal lash.
- Shear lashing.
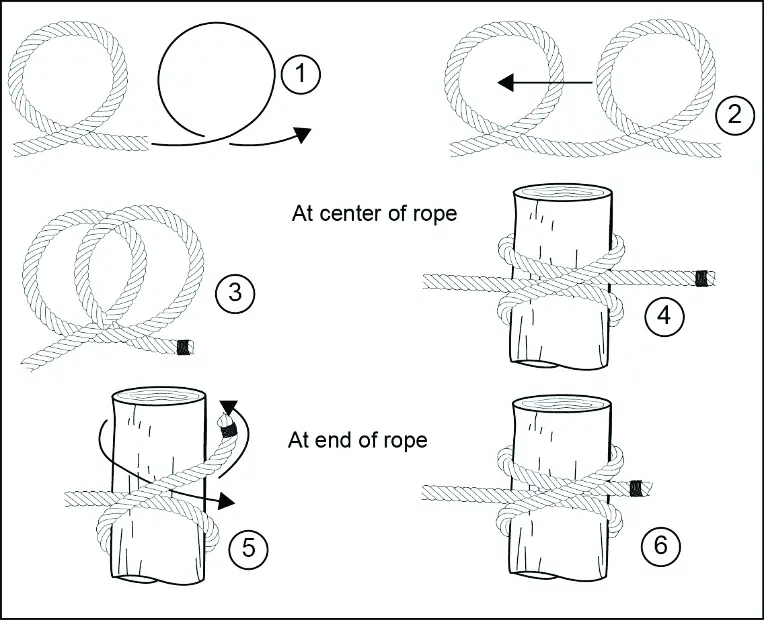
SQUARE LASHING
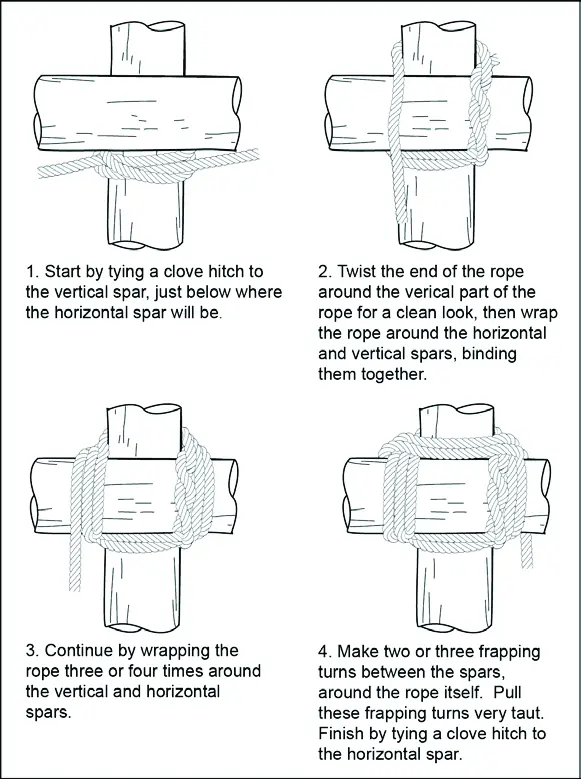
A-28. Square lashing is started with a clove hitch around the log, immediately under the place where the crosspiece is to be located. In laying the turns, the rope goes on the outside of the previous turn around the crosspiece, and on the inside of the previous turn around the log. The rope should be kept tight. Three or four turns are necessary. Two or three "frapping" turns are made between the crosspieces. The rope is pulled tight; this will bind the crosspiece tightly together. It is finished with a clove hitch around the same piece that the lashing was started on. The square lash is used to secure one pole at right angles to another pole. Another lash that can be used for the same purpose is the diagonal lash (see figure A-18).
DIAGONAL LASHING
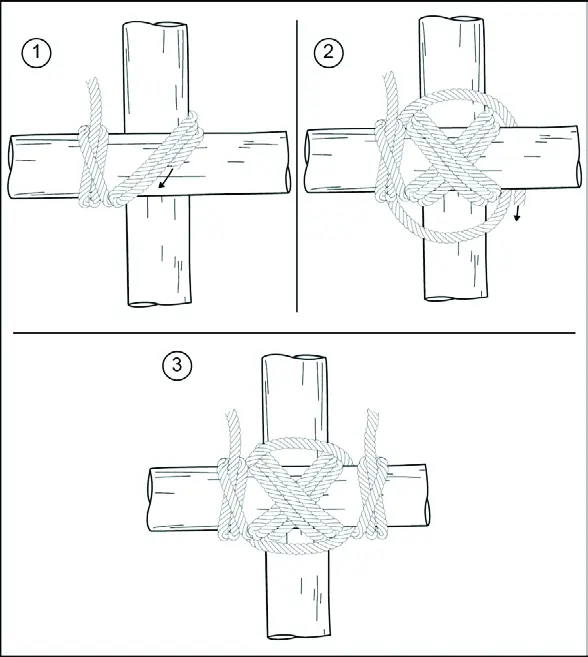
A-29. Diagonal lashing is started with a clove hitch around the two poles at the point of crossing. Three turns are taken around the two poles. The turns lie beside each other, not on top of each other. Three more turns are made around the two poles, this time crosswise over the previous turns. The turns are pulled tight. A couple of frapping turns are made between the two poles, around the lashing turns, making sure they are tight. The lashing is finished with a clove hitch around the same pole the lash was started on (see figure A-19).
SHEAR LASHING
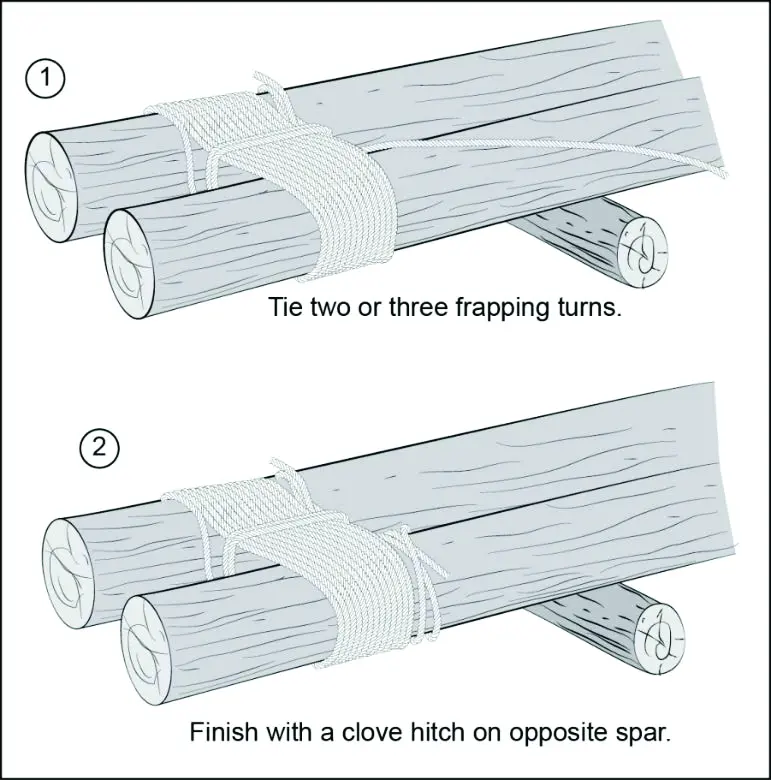
A-30. Shear lashing is used for lashing two or more poles in a series. The desired numbers of poles are placed parallel to each other and the lash is started with a clove hitch on an outer pole. The poles, laid loosely beside each other, are often lashed together using seven or eight turns of the rope. Make frapping turns between each pole. The lashing is finished with a clove hitch on the pole opposite that on which the lash was started (see figure A-20).
ROPE CONSTRUCTION
A-31. There are two basic types of rope to use in an isolation situation-natural fiber ropes and manmade fiber ropes. Both types have different strengths and weaknesses. Isolated persons should know as much about the properties of rope as they can. This will allow them to use or, in some cases, improvise ropes of their own; creating the right tool for the task that will keep from wasting time, energy, and effort.
NATURAL FIBER TYPES
A-32. Natural fiber ropes are made from natural fibers from plants and animals such as grasses, siècle, hemp, cotton, manila, hair, leather, and sinew. These fibers are either twisted or braided into a single flexible structure that has a high degree of tensile strength. Natural ropes are resistant to friction-generated heat but can be destroyed if the fibers are cut with a sharp rock or knife. Natural rope can be cut into sections using abrasion; for example, rubbing it vigorously across rock, cement, concrete, metal, or wood surfaces. When the integrity of the fibers is damaged, the rope can be separated into sections or broken down to be used for other purposes. Most natural ropes are thicker in diameter and can be difficult to tie knots with. If not cared for and kept clean, natural fiber ropes can begin to break down and lose tensile strength.
MANMADE FIBER TYPES
A-33. Manmade fiber ropes are manufactured from fibers made out of fabrics like polypropylene, nylon, and Kevlar. Manmade ropes are braided or twisted into a single, flexible structure. Manmade fiber ropes are strong because the fibers are strong and can be manufactured in one long continuous strand with no splices of fiber being used during the construction process.
A-34. Manmade fiber ropes are water and weather resistant. Because these ropes are essentially made from plastic material, they are susceptible to break down from friction-generated heat and abrasion. Isolated personnel can use a piece of Kevlar-like material or parachute cord to saw these lengths of rope into usable pieces through melting them with friction-generated heat. These ropes can also be cut with a knife, a rock, or a piece of glass. Manmade fiber ropes are good for tying knots but should still be kept clean and out of the sun for UV protection and damage mitigation.
A-35. Kernmantle rope is a type of a manmade fiber rope that has an outer sheath with smaller fibers running through the center known as intercore fibers. This type of construction makes kernmantle ropes very strong and abrasion resistant. They are commonly used for rock climbing and other functions like repelling. Kernmantle ropes come in two types-static (will not stretch) and dynamic (designed to stretch and return to its original manufactured shape). Parachute cord is a good example of this type of static construction.
CONSTRUCTION TECHNIQUES
A-36. Almost any natural fibrous material can be spun into good serviceable rope or cord, and many materials which have a length of 12 to 24 inches or more can be braided. Ropes up to 3 and 4 inches in diameter can be "laid" by four people, and tensile strength for bush-made rope of 1 inch in diameter ranges from 100 pounds to as high as 3,000 pounds.
A-37. Using a three-lay rope of 1-inch diameter as standard, the following table of tensile strengths (table A- 1) may serve to illustrate general strengths of various materials. For safety's sake, the lowest figure should always be regarded as the tensile strength.
Table A-1. Tensile strength of natural fibers
| Fiber | Tensile Strength (in Pounds) |
|---|---|
| Green grass | 100 to 250 |
| Bark fiber | 500 to 1,500 |
| Palm fiber | 650 to 2,000 |
| Sedges | 2,000 to 2,500 |
| Money rope (lianas) | 560 to 700 |
| Lawyer vine (calamus), ½-inch diameter | 1,200 |
Note: Doubling the diameter quadruples the tensile strength; half the diameter reduces the tensile strength to one-fourth
TWISTING TECHNIQUE
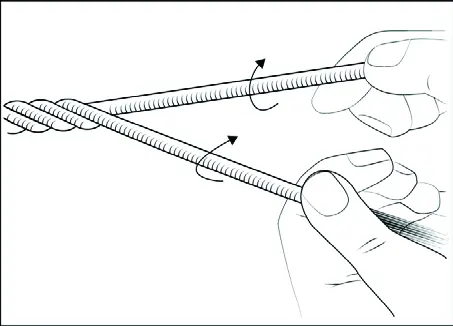
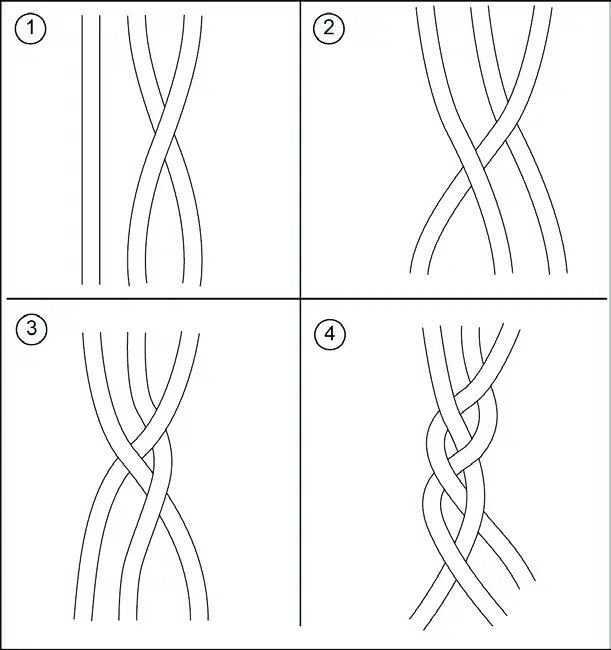
A-38. Use any material with long strong threads or fibers which have been previously tested for strength and pliability. Gather the fibers into loosely held strands of even thickness. Each of these strands is twisted clockwise. The twist will hold the fibers together. The strands should be formed into a one-eighth inch diameter. As a general rule, there should be about 15 to 30 fibers to a strand. Two, three, or four of these strands are later twisted together or "layered" with a counterclockwise twist, while at the same time, the separate strands which have not yet been laid up are twisted clockwise. Each strand must be of equal twist and thickness (see figure A-21).
A-39. In a similar manner, the twisted strands are put together into lays, and the lays into ropes. Isolated personnel must twist the strands together and ensure that the twisting is even, the strands are uniform, and the tension on each strand is equal. In "laying," care must be taken to ensure that each of the strands is evenly "laid up;" that is; one strand does not twist around the other.
A-40. When spinning fine cords for fishing lines, and snares considerable care must be taken to keep the strands uniform and the lay even. Fine thin cords of no more than 1/32-inch thickness can be spun with the fingers and are capable of taking a breaking strain of 20 to 30 pounds or more.
A-41. Normally two or more people are required to spin and lay up the strands for cord. However, many native people spin cord unaided. They twist the material by running the flat of the hand along the thigh, with the fibrous material between hand and thigh; with the free hand, they feed in fiber for the next "spin." Using this technique, one person can make long lengths of single strands. This method of making cord or rope with the fingers is slow if any considerable length of cord is required.
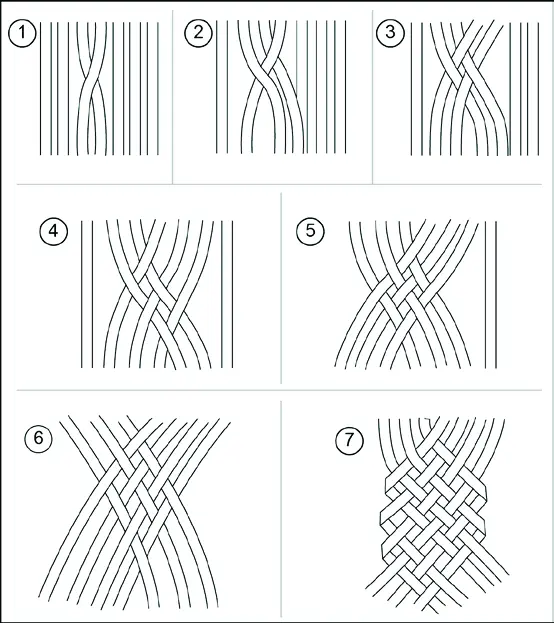
BRAIDING TECHNIQUES
A-42. One person may require a length of rope. If there is no help available to spin materials, it is necessary to find reasonably long material. With this material a isolated person can braid and make suitable rope without assistance. The usual three-strand braid makes a flat rope and, while quite good, it does not have finish or shape and is not as tight as the four-strand braid. On other occasions, it may be necessary to braid broad bands for belts for shoulder straps. There are many fancy braids which can be developed from these, but the following three braids are basic and essential for practical woodcraft work. A general rule for all braids is to work from the outside into the center.
Three-plait braid
A-43. Use the following steps to make a three-plait braid (see figure A-22):
- Step 1. Pass the right-hand strand over the strand to the left.
- Step 2. Pass the left-hand strand over the strand to the right.
- Step 3. Repeat this process alternately from left to right.
Broad braid
A-44. Use the following steps to make a broad braid (see figure A-23):
- Step 1. Hold six or more strands flat and together.
- Step 2. Pass a strand in the center over the next strand to the left.
- Step 3. Pass the second strand to the left of center toward the right and over the first strand so that it points toward the right.
- Step 4. Take the strand next to the first one and woven it under and over.
- Step 5. Weave the next strands from left and right, alternatively, towards the center. The finished braid should be tight and close.
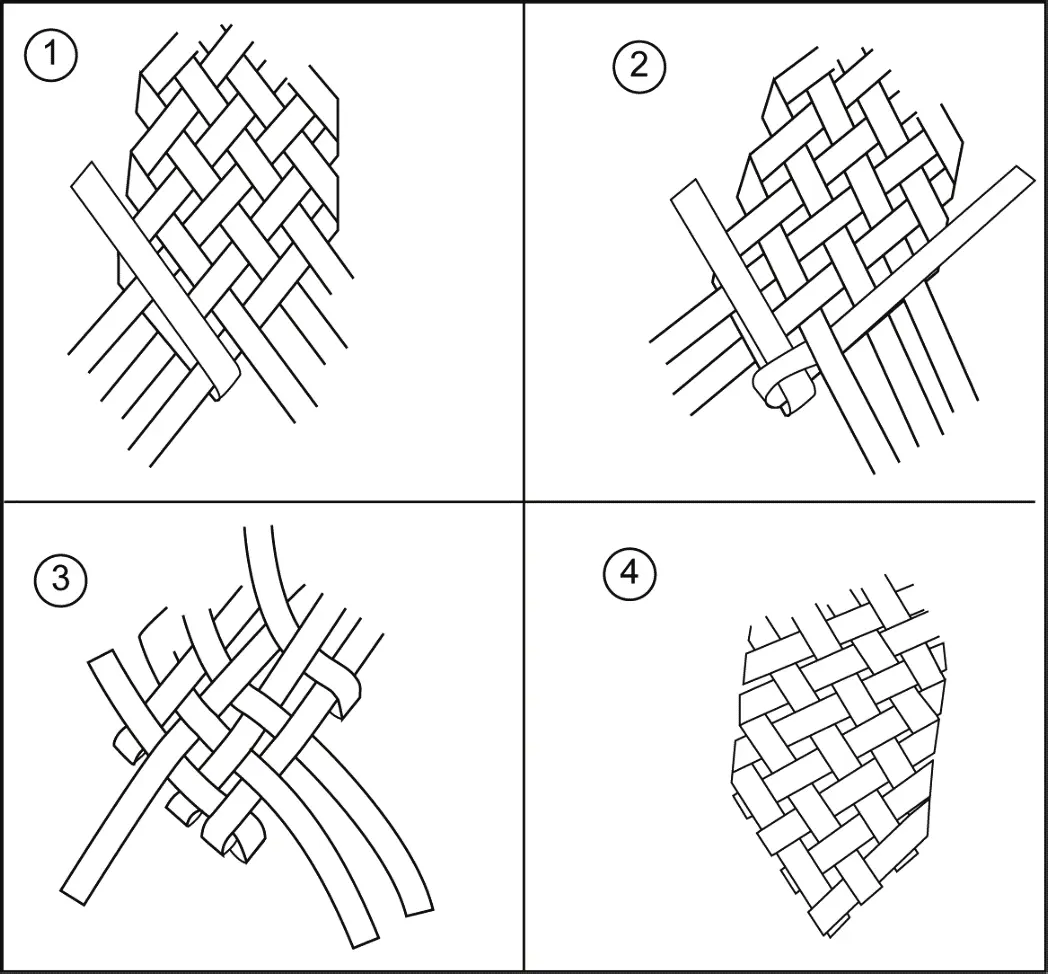
A-45. Use the following steps to finish the broad braid (see figure A-24 on page A-24):
- Step 1. Lay one of the center strands back upon itself.
- Step 2. Take the first strand which it enclosed in being folded back, and weave this back upon itself.
- Step 3. Lay back the strand from the opposite side and weave it between the strands already braided. All the strands should be so woven back that no strands show an uneven pattern, and there should be a regular under-over-under of the alternating weaves. If the braid is tight, there may be a difficulty in working the loose ends between the plaited strands. This can be done easily by sharpening a thin piece of wood to a chisel edge to open the strands sufficiently to allow the ends being finished to pass between the woven strands.
- Step 4. Roll the braid under a bottle or other round object and to achieve a smooth final finish.
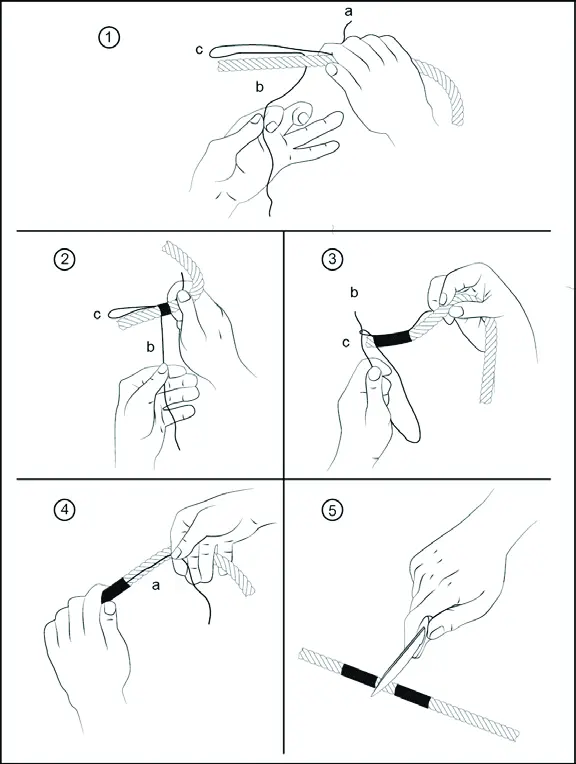
Whipping the Ends
A-46. The raw, cut end of a rope has a tendency to untwist and should always be knotted or fastened in some manner. Whipping is one method of fastening the end of a rope. This method is particularly satisfactory because it does not increase the size of the rope. The whipped end of a rope will still thread through blocks or other openings. Before cutting a rope, place two whippings on the rope 1 or 2 inches apart and make the cut between the whippings. This will prevent the cut ends from untwisting immediately after they are cut. A rope is whipped by wrapping the end tightly with a small cord.
A-47. Make a bight near one end of the cord and lay both ends of the small cord along one side of the rope. The bight should project beyond the end of the rope about one-half inch. Wrap the running end of the cord tightly around the rope and cord starting at the end of the whipping (this will be farthest from the end of the rope). The wrap should be in the same direction as the twist of the rope strands. Continue wrapping the cord around the rope, keeping it tight, to within about one-half inch of the end.
A-48. At this point, slip the running end through the bight of the cord. The standing part of the cord can then be pulled until the bight of the cord is pulled under the whipping and the cord is tightened. Cut the ends of the cord at the edge of the whipping, leaving the rope end whipped (see figure A-25).